
自动配置原理入门,看看 SpringBoot 怎么就自动做了那么多事!
虽然已经工作好几年了,但是应该就是那种一年工作经验用好几年的人吧,一直忙于工作,兢兢业业,但是没有过总结,真的明白的时候发现已经荒废了好几年,把握现在,成就更好的明天。
本文参考雷神教程 + 官网手册,记录下自己的学习经历和成长!
首先雷神教程在这里:雷神 ,官网手册在这里:Spring Boot 手册
自动配置原理入门
1. 引导加载自动配置类
- @SpringBootApplication 相当于下面三个注解的合成,下面我们一个看。
@SpringBootApplication
public class MainApplication {
    public static void main(String[] args) {
        SpringApplication.run(MainApplication.class, args);
    }
}

// ========================================================================================
@SpringBootConfiguration
@EnableAutoConfiguration
@ComponentScan(excludeFilters = { @Filter(type = FilterType.CUSTOM, classes = TypeExcludeFilter.class),
		@Filter(type = FilterType.CUSTOM, classes = AutoConfigurationExcludeFilter.class) })
public @interface SpringBootApplication {
}
1.1 @SpringBootConfiguration
- 相当于 @Configuration ,代表当前是一个配置类。
@Configuration
public @interface SpringBootConfiguration {
}
1.2 @ComponentScan
- 指定扫描哪些包。
1.3 @EnableAutoConfiguration
- 所以自动配置最主要的就是 @EnableAutoConfiguration 这个注解了,它是下面这两个注解的合成。
@AutoConfigurationPackage
@Import(AutoConfigurationImportSelector.class)
public @interface EnableAutoConfiguration {
}
- @AutoConfigurationPackage
- 见名知意:自动配置包。
- 自动给容器中导入一个 Registrar 组件,然后利用 Registrar 给容器中导入了一系列的组件。
// 将一个指定的包下的所有组件导入进来。即MainApplication所在的包下。
@Import(AutoConfigurationPackages.Registrar.class)
public @interface AutoConfigurationPackage {
}
- @Import(AutoConfigurationImportSelector.class)
- 实现了 ImportSelector 这个接口,并且重写了 public String[] selectImports(AnnotationMetadata annotationMetadata) 这个方法,那么 SpringBoot 会将返回的类的全类名放入容器中。
@Override
public String[] selectImports(AnnotationMetadata annotationMetadata) {
    if (!isEnabled(annotationMetadata)) {
        return NO_IMPORTS;
    }
    AutoConfigurationEntry autoConfigurationEntry = getAutoConfigurationEntry(annotationMetadata);
    return StringUtils.toStringArray(autoConfigurationEntry.getConfigurations());
}
- 接着利用 getAutoConfigurationEntry() 这个方法给容器中批量导入了一些组件。
/**
 * Return the {@link AutoConfigurationEntry} based on the {@link AnnotationMetadata}
 * of the importing {@link Configuration @Configuration} class.
 * @param annotationMetadata the annotation metadata of the configuration class
 * @return the auto-configurations that should be imported
 */
protected AutoConfigurationEntry getAutoConfigurationEntry(AnnotationMetadata annotationMetadata) {
    if (!isEnabled(annotationMetadata)) {
        return EMPTY_ENTRY;
    }
    AnnotationAttributes attributes = getAttributes(annotationMetadata);
    // 获取所有候选的配置
    List<String> configurations = getCandidateConfigurations(annotationMetadata, attributes);
    // 下面都是一些处理、过滤,找到符合规则的进行返回
    configurations = removeDuplicates(configurations);
    Set<String> exclusions = getExclusions(annotationMetadata, attributes);
    checkExcludedClasses(configurations, exclusions);
    configurations.removeAll(exclusions);
    configurations = getConfigurationClassFilter().filter(configurations);
    fireAutoConfigurationImportEvents(configurations, exclusions);
    return new AutoConfigurationEntry(configurations, exclusions);
}
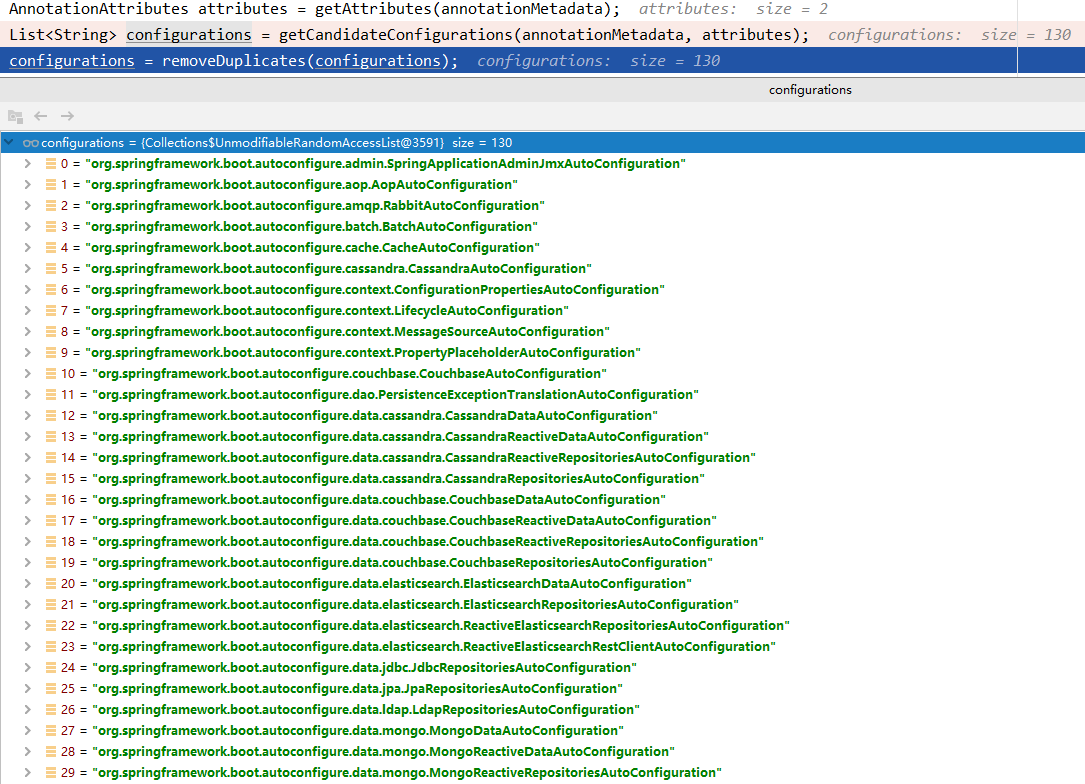
- 断点后启动程序,执行完这个方法后,可以看到获取到 130 个配置类信息。
- 然后继续跟进进入 getCandidateConfigurations() 这个方法内部。
/**
 * Return the auto-configuration class names that should be considered. By default
 * this method will load candidates using {@link SpringFactoriesLoader} with
 * {@link #getSpringFactoriesLoaderFactoryClass()}.
 * @param metadata the source metadata
 * @param attributes the {@link #getAttributes(AnnotationMetadata) annotation
 * attributes}
 * @return a list of candidate configurations
 */
protected List<String> getCandidateConfigurations(AnnotationMetadata metadata, AnnotationAttributes attributes) {
	List<String> configurations = SpringFactoriesLoader.loadFactoryNames(getSpringFactoriesLoaderFactoryClass(),
			getBeanClassLoader());
	Assert.notEmpty(configurations, "No auto configuration classes found in META-INF/spring.factories. If you "
			+ "are using a custom packaging, make sure that file is correct.");
	return configurations;
}
- 继续下一个方法 loadFactoryNames() 。
/**
 * Load the fully qualified class names of factory implementations of the
 * given type from {@value #FACTORIES_RESOURCE_LOCATION}, using the given
 * class loader.
 * <p>As of Spring Framework 5.3, if a particular implementation class name
 * is discovered more than once for the given factory type, duplicates will
 * be ignored.
 * @param factoryType the interface or abstract class representing the factory
 * @param classLoader the ClassLoader to use for loading resources; can be
 * {@code null} to use the default
 * @throws IllegalArgumentException if an error occurs while loading factory names
 * @see #loadFactories
 */
public static List<String> loadFactoryNames(Class<?> factoryType, @Nullable ClassLoader classLoader) {
	ClassLoader classLoaderToUse = classLoader;
	if (classLoaderToUse == null) {
		classLoaderToUse = SpringFactoriesLoader.class.getClassLoader();
	}
	String factoryTypeName = factoryType.getName();
	return loadSpringFactories(classLoaderToUse).getOrDefault(factoryTypeName, Collections.emptyList());
}
- 继续下一步执行 loadSpringFactories() 方法,最终利用工厂加载得到所有组件。
private static Map<String, List<String>> loadSpringFactories(ClassLoader classLoader) {
	Map<String, List<String>> result = cache.get(classLoader);
	if (result != null) {
		return result;
	}

	result = new HashMap<>();
	try {
        // 从 META-INF/spring.factories 位置加载一个文件。
        // public static final String FACTORIES_RESOURCE_LOCATION = "META-INF/spring.factories";
        // 默认扫描当前系统所有 META-INF/spring.factories 位置的文件。
		Enumeration<URL> urls = classLoader.getResources(FACTORIES_RESOURCE_LOCATION);
		while (urls.hasMoreElements()) {
			URL url = urls.nextElement();
			UrlResource resource = new UrlResource(url);
			Properties properties = PropertiesLoaderUtils.loadProperties(resource);
			for (Map.Entry<?, ?> entry : properties.entrySet()) {
				String factoryTypeName = ((String) entry.getKey()).trim();
				String[] factoryImplementationNames =
						StringUtils.commaDelimitedListToStringArray((String) entry.getValue());
				for (String factoryImplementationName : factoryImplementationNames) {
					result.computeIfAbsent(factoryTypeName, key -> new ArrayList<>())
							.add(factoryImplementationName.trim());
				}
			}
		}

		// Replace all lists with unmodifiable lists containing unique elements
		result.replaceAll((factoryType, implementations) -> implementations.stream().distinct()
				.collect(Collectors.collectingAndThen(Collectors.toList(), Collections::unmodifiableList)));
		cache.put(classLoader, result);
	}
	catch (IOException ex) {
		throw new IllegalArgumentException("Unable to load factories from location [" +
				FACTORIES_RESOURCE_LOCATION + "]", ex);
	}
	return result;
}
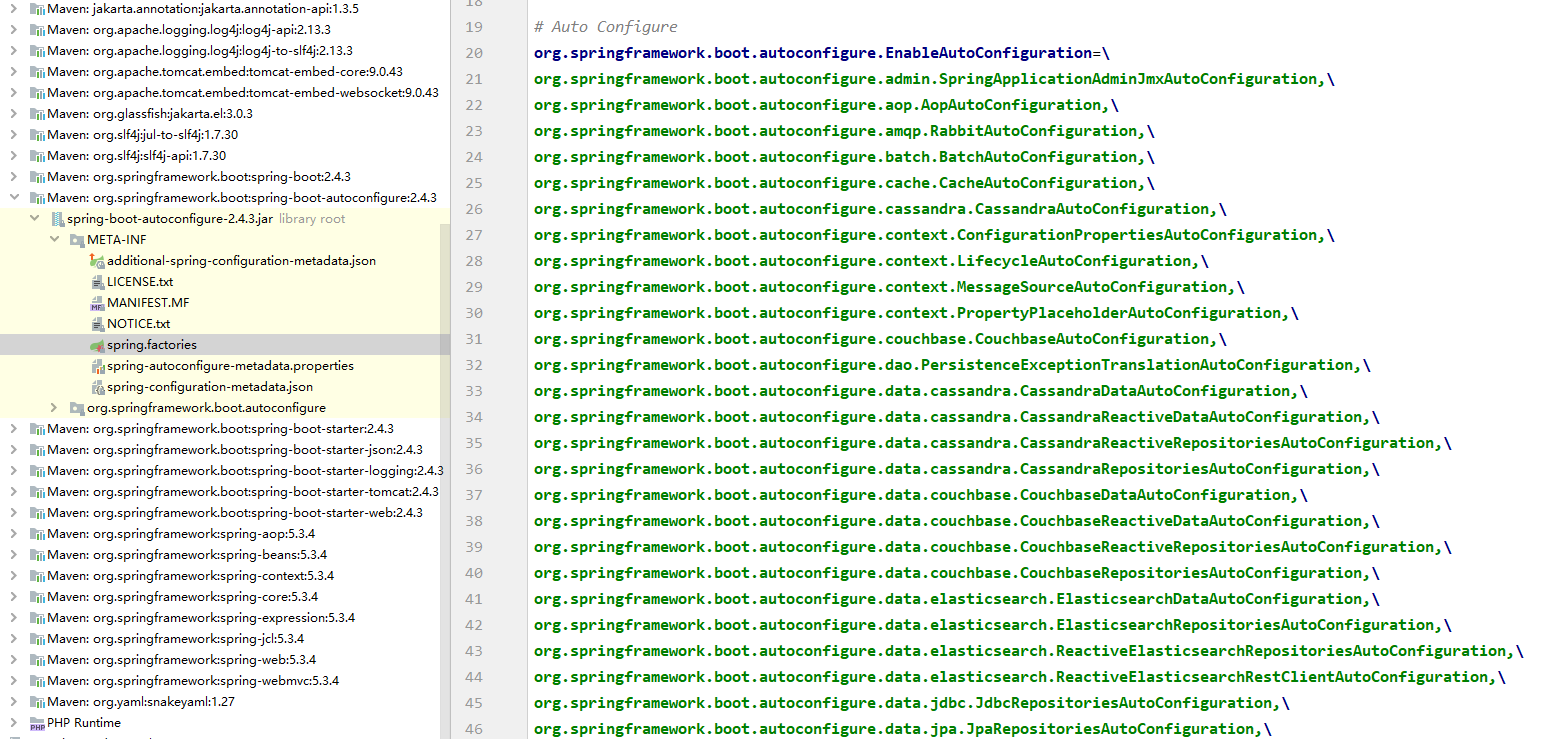
- spring-boot-autoconfigure-2.4.3.jar 这个包下 META-INF/spring.factories 这个目录刚好就有这个文件。
- 里面写死了 SpringBoot 一启动就要给容器中加载的所有配置类,一共刚好 130 个,与程序中断点处一致。
# Auto Configure
org.springframework.boot.autoconfigure.EnableAutoConfiguration=\
org.springframework.boot.autoconfigure.admin.SpringApplicationAdminJmxAutoConfiguration,\
org.springframework.boot.autoconfigure.aop.AopAutoConfiguration,\
org.springframework.boot.autoconfigure.amqp.RabbitAutoConfiguration,\
org.springframework.boot.autoconfigure.batch.BatchAutoConfiguration,\
org.springframework.boot.autoconfigure.cache.CacheAutoConfiguration,\
org.springframework.boot.autoconfigure.cassandra.CassandraAutoConfiguration,\
org.springframework.boot.autoconfigure.context.ConfigurationPropertiesAutoConfiguration,\
org.springframework.boot.autoconfigure.context.LifecycleAutoConfiguration,\
org.springframework.boot.autoconfigure.context.MessageSourceAutoConfiguration,\
org.springframework.boot.autoconfigure.context.PropertyPlaceholderAutoConfiguration,\
org.springframework.boot.autoconfigure.couchbase.CouchbaseAutoConfiguration,\
org.springframework.boot.autoconfigure.dao.PersistenceExceptionTranslationAutoConfiguration,\
org.springframework.boot.autoconfigure.data.cassandra.CassandraDataAutoConfiguration,\
org.springframework.boot.autoconfigure.data.cassandra.CassandraReactiveDataAutoConfiguration,\
org.springframework.boot.autoconfigure.data.cassandra.CassandraReactiveRepositoriesAutoConfiguration,\
org.springframework.boot.autoconfigure.data.cassandra.CassandraRepositoriesAutoConfiguration,\
...
- spring.factories 文件如图所示。
2. 按需开启自动配置项
- 程序一启动就会将所有的 130 个配置类全部加载。
- 最终会按照条件装配规则 @Conditional 按需进行配置。
3. 修改默认规则
- DispatcherServletAutoConfiguration 自动配置类中有下面一段代码。
@Bean
// 容器中有这个类型的组件
@ConditionalOnBean(MultipartResolver.class)
// public static final String MULTIPART_RESOLVER_BEAN_NAME = "multipartResolver";
// 容易中没有 multipartResolver 这个名字的组件
@ConditionalOnMissingBean(name = DispatcherServlet.MULTIPART_RESOLVER_BEAN_NAME)
// 给 @Bean 标注的方法传入了对象参数,这个参数的值就会从容器中找
// 防止某些用户配置的文件上传解析器不规范
public MultipartResolver multipartResolver(MultipartResolver resolver) {
    // Detect if the user has created a MultipartResolver but named it incorrectly
    return resolver;
}
- SpringBoot 默认会在底层配置好所有的组件,但是如果用户自己配置了以用户的优先。
@Bean
// 如果没有这个 Bean 则生效
@ConditionalOnMissingBean
public CharacterEncodingFilter characterEncodingFilter() {
    CharacterEncodingFilter filter = new OrderedCharacterEncodingFilter();
    filter.setEncoding(this.properties.getCharset().name());
    filter.setForceRequestEncoding(this.properties.shouldForce(Encoding.Type.REQUEST));
    filter.setForceResponseEncoding(this.properties.shouldForce(Encoding.Type.RESPONSE));
    return filter;
}
总结:
- SpringBoot先加载所有的自动配置类。 xxxAutoConfiguration
- 每个自动配置类按照条件生效,默认都会绑定配置文件指定的值,从 xxxProperties 里面获取。xxxProperties 同时与配置文件进行绑定。
- 生效的自动配置类就会给容器装配很多组件。
- 只要容器中有这些组件,就相当于这些功能就有了。
- 只要用户自己配置了,就以用户的优先。
- 定制化配置:
- 用户直接使用 @Bean 替换底层组件
- 用户去看这个组件是获取配置文件哪个值,直接修改配置文件即可。
4. 最佳实践
- 引入场景依赖
- 官方场景依赖
- 第三方场景依赖
- 查看自动配置了哪些组件
- 自己看源码分析。
- 配置文件中配置 debug=true ,开启自动配置报告分析。Negative(不生效)Positive(生效)
- 是否需要修改
- 自己分析 xxxProperties 绑定了哪些配置。
- 参考官方文档修改配置项
- 自定义加入或者替换组件(@Bean、@Component)
- 使用自定义器 xxxCustomizer 。
- …
5. 开发小技巧
5.1 Lombok使用
- 简化 JavaBean 开发。
- 第一步进入依赖,第二步 Idea 安装插件。
<dependency>
    <groupId>org.projectlombok</groupId>
    <artifactId>lombok</artifactId>
</dependency>
@Data
@NoArgsConstructor
@AllArgsConstructor
public class Pet {
    private String name;
}

// ========================================================================================
@Data
@NoArgsConstructor
@AllArgsConstructor
@EqualsAndHashCode
public class User {
    private String name;
    private Integer age;
    private Pet pet;

    public User(String name, Integer age) {
        this.name = name;
        this.age = age;
    }
}

// ========================================================================================
@Data
@Component
@ConfigurationProperties(prefix = "mycar")
public class Car {
    private String brand;
    private Integer price;
}

// ========================================================================================
@Slf4j
@RestController
public class HelloController {

    @Autowired
    Car car;

    @RequestMapping("/car")
    public Car car() {
        return car;
    }

    //@ResponseBody
    @RequestMapping("/hello")
    public String hello01(@RequestParam(value = "name", required = false) String name) {
        log.info("请求进来了...");
        return "你好 SpringBoot 2,我是" + name;
    }
}
5.2 DevTools 使用
- 引入依赖,修改代码后 Ctrl + F9 重新编译项目,项目就会自动重启。
<dependency>
    <groupId>org.springframework.boot</groupId>
    <artifactId>spring-boot-devtools</artifactId>
    <optional>true</optional>
</dependency>
5.3 Idea 的 Spring Initializr
- 使用 Idea 的 Spring Initializr 创建项目,修改好包名、项目名,勾选所需要的开发场景,可以直接生成项目。
- 帮我们创建好了目录结构。
- 帮我们创建好了主程序类。
- 只需要关注业务逻辑开发即可。
文档信息
- 本文作者:臭粑粑大朱
- 本文链接:https://www.hkyzf.top/2021/08/06/java-springboot-autoconfigure/
- 版权声明:自由转载-非商用-非衍生-保持署名(创意共享3.0许可证)